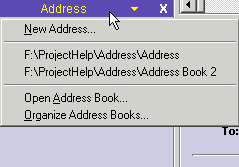
Following operations can be done from this screen:
When you first install PocoMail, the default pane layout shows the Address List Pane in the lower left column just under the Mailbox Pane.
You can choose a different layout from Pane Layout screen in the Program Options; however, if you only wish to make the Address List Pane available and visible when you want it to be, you can simply toggle the pane off and on (invisible and visible, respectively). From the PocoMail Menu - View, Toggle Address List Pane (Quick Key F6). To quickly toggle off, you can also click on the X in the right corner of the Address List Pane.
The options are:
Address Book can also be accessed from PocoMail Menu - Tools, Address Book (Quick Key F5).
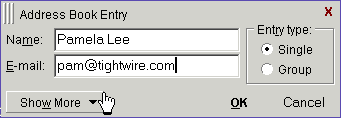
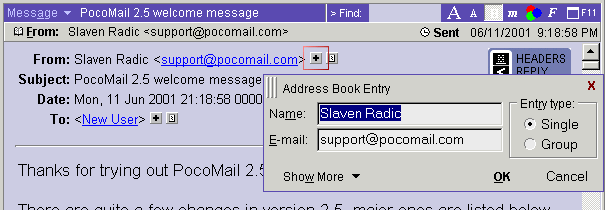
This is the simplest of the address entry screens. If you really don't need or want to enter any more information, click on OK, and the entry will appear in the Address Book.
However, if you want to keep even more information on this entry, click on Show More for expanded entries.
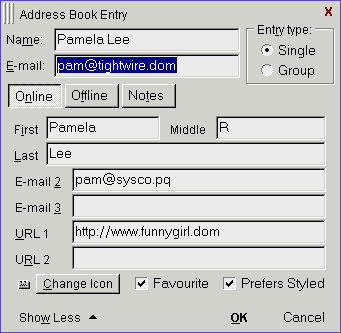
Fill in as much or as little as you wish in this Online screen. All the information on this screen is e-mail or internet related, thus the name. PocoMail will use the Name field, and not the First or Last Name information, when auto-completing a name to be inserted in the To: field when you are composing messages.
Some of the choices in this screen may need further clarification:
![]() How to change the default icon?
How to change the default icon?
You can also change the default icon used for all address book entries without changing the individual icon entries. Place two icons named DEFAULT1.ICO and DEFAULT2.ICO into PocoMail's Icons directory and PocoMail will use those icons next time you start it. First icon will be used for regular address book entries, and second icon will be used for group address book entries.
The next screen for expanded address entries is Offline. This is information on the addressee that is non-internet related, with the exception of the Nickname field. The nickname entered here will be used in the auto-complete/address look up feature if you have enabled the nickname option in Address Lookup in Program Options.
If the appropriate Address Lookup option is enabled, typing "pam" in the To: field of a new message window would auto-complete to "Pamela Lee <pam@tightwire.com>".
Use the Notes tab to enter any other miscellaneous information related to the addressee that you wish to be able to access easily from inside PocoMail.
Click OK when you are done entering information. The individual entry will now appear in the address book.
By default, the entry screen selects "Single" as it is more likely the majority of entries will be for individuals. However, for a group address entry, you will need to click on "Group." This will expand the entry screen so that you can enter a list of addresses.
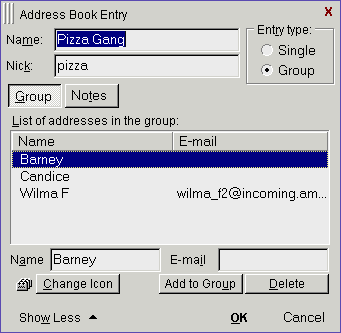
You can add entries to the group list for individuals already existing in any of PocoMail's address books or new ones that are not present outside the group. Depending upon what options are enabled in Address Lookup, if you do not enter an actual e-mail address for the group member PocoMail will search all loaded address books for matching names or nicknames or e-mail addresses (or all). Entering the e-mail address for a member will use that address regardless of any other information stored for that person outside the group. After you filled in Name or E-mail fields click on Add to Group to add the member to the group. You can add any miscellaneous information about the group to the Notes screen. When you are done, click on OK.
If you make a mistake and need to delete an entry, highlight that name and click on Delete.
The "Pizza Gang" will appear as a highlighted address entry in the Address Book, in collapsed form, denoted by a + (red plus sign) next to the entry. To see who belongs to this group from the Address Pane, expand the group by clicking on the plus sign. Click on the - (green minus sign) to collapse the group.
When you use the address book entry (by name or by nickname) for a group in composing a new message, all the individual addressees will appear in the "To:" field, and not the name "Pizza Gang".
The short headers will need to be active for you to add entries from received mail messages.
Click on the + (plus sign) next to the address you wish to add (highlighted with a red square in the image above). The Address Book Entry screen will popup and you can accept or edit the information PocoMail fills in.
You can also add entries from the Index Pane by right-clicking on the highlighted message to access the drop down menu. Select Add [name] to Address Book.
If short headers are not displayed or you want to add an address shown elsewhere in the message (for example, in the message signature area) you can always add the address to the address book by right clicking on the address and selecting Add Address to Address Book.
Entries added using these procedures will add them to the Address Book currently displayed in the Address Pane or the current active Address Book (what would be displayed in the Pane if you toggled F6).
Choose to display by name/nick only, by nickname, by name or by e-mail address. This will, of course, depend upon the information you have entered in the Address entry screens. If you select the first option (by name/nick only) then the e-mail address will not be shown in the display, while the other options will show the address. List will also be automatically sorted by whatever field you chose.
To send a message to multiple addresses in your address book first select the addresses you want to send to by holding Shift or Ctrl key while single-clicking on correct entries. When you have made your selection either press Enter or right-click on a selected address and choose New Message.
To bring up the Report on Address box:
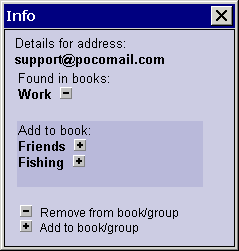
The information contained in this box reports on the "status" of the address, including what address books and groups it appears in.
You can easily add the address to any or all of the currently loaded address books or groups by clicking on the plus sign icon. Adding to groups using this feature makes it especially easy to maintain mailing lists.
Conversely, if the address was already part of several books or groups and you wanted to delete the address from some or all of them, a minus sign icon, rather than a plus sign icon, would appear next to the appropriate address books or groups. Clicking on the minus sign icon would delete that entry.
Open Address Book by:
The Address Book Menu options are:
You can access another address book by using the drop down menu from the "Current Address book" field.
Some of these functions can also be accessed through the address list pane via the pop up right-click menu.
If you need to copy or move items between groups or into groups you can simply drag and drop them right from the address list pane. If you hold Ctrl key while dropping the item it will be copied instead of moved to the group; if you hold Shift key then the item will be copied into the group with nickname or name only, to make the group maintenance easier.
![]()
![]()